If you are missing VirtualBox or if your VirtualBox-version is older than 6.1.40, it is necessary to do these steps:
-
Make sure your machine is equipped with a 64-bits processor.
Primary memory > 1 GB
Free hard disk space > 55 GB
Restart your machine and check in your BIOS that Virtualization Technology is enabled.
Information on how to adjust BIOS-settings can be found here: wikihow or lifewire - If necessary, uninstall the old VirtualBox-version.
-
Download and install the new version of VirtualBox.
(VirtualBox 7 requires that also the following two packages are installed:
https://learn.microsoft.com/en-US/cpp/windows/latest-supported-vc-redist?view=msvc-170
(Scroll down to Latest Microsoft Visual C++ Redistributable Version and download X86, X64 or ARM64 depending on your computer. To see the architecture of your windows machine click: Start -> Setting -> About. In the window that is now opened should show information about your computer, please look for the title System type.)
https://www.python.org/downloads/
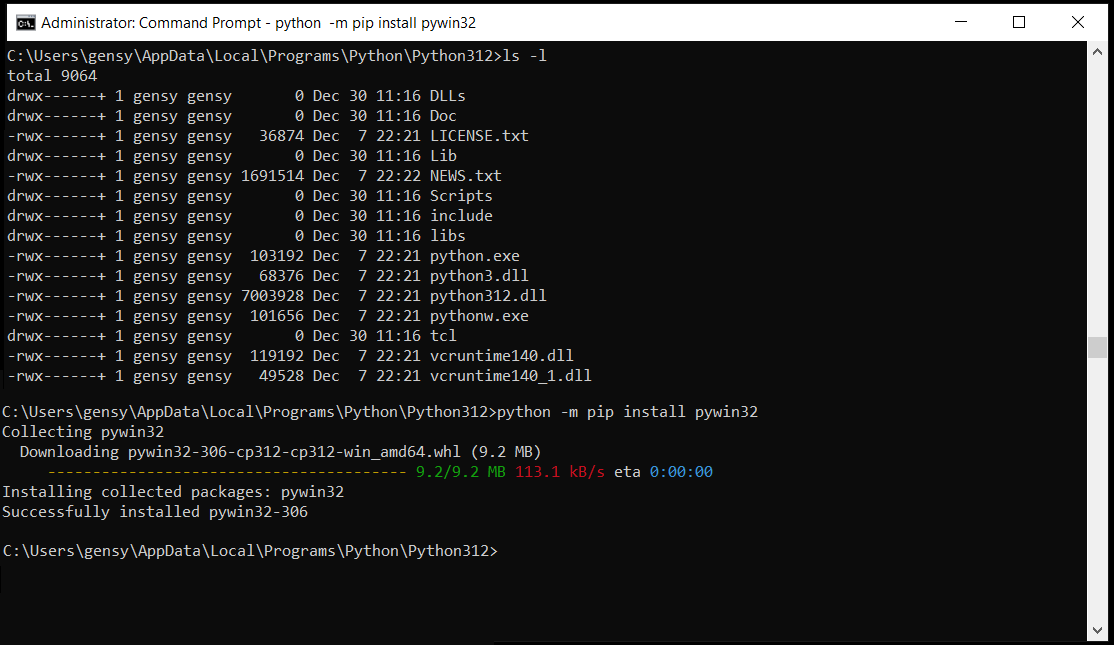
Once python is installed, open cmd with elevated privileges, go to the location where Python was installed, and execute the following command:
python -m pip install pywin32
Now your machine is ready to install VirtualBox 7. Please launch the VirtualBox installer.) -
Start program VirtualBox
-
In the PullDown-menu of program VirtualBox click "File -> Preferences"
On the left side in the popup-window select "Input"
On the right side select "Virtual Machine"
As default in VirtualBox "Host Key Combination" is set equal to Right CTRL. If you wish to be able to use your "Right CTRL"-Key, please choose another key. (The "Host Key Combination" is mainly useful in case you don't have a working mouse, and when you want to leave full screen mode)
Finish by clicking "OK"
N.B. In this step you will create the following three directories: free_models, homepage and verif. If you have old versions of these directories, they will be overritten.
If you want to keep your old versions of free_models, homepage and verif. You can skip this part, or you can uncompress the files at another location, and then compare the directories with each other using script opdiff_dir.
-
Create a directory where you want to keep Gensys documentation files, verification examples
and your own workfiles.
The directory must have permissions so it can be used as a Shared Folder with the virtual machine.
E.g.: "C:\Users\Public\gensys" on a Windows-host or "$HOME/gensys" on a UNIX-host. -
In the newly created work directory.
Also create a directory where you can keep your own work files.
E.g.: "analyse" -
Download the following files:
free_models-2401.7z        = Free vehicle models
homepage-2401.7z           = Documentation and tutorials
verif-2401.7z              = Verification directory
Webpage mega.nz requires a webbrowser that handles HTML5 and allows JavaScript to create and write to files. Currently Chrome and Firefox works best.
Also make sure that no firewall prevents you from downloading files from the Internet.
The SHA256 message digest algorithm should give you the following output:bbab303b5850ecc14ddfbbef7290ffbdce860c4dcd470dedcbeef9eff7c1e179 free_models-2401.7z 1a7e37843763b732ad8ba7fc29a69fdf62df4f1cba32f7bd25e8c50b6f6fb07d homepage-2401.7z 47d96ec4b9043078d6ecd24228e72872fd878cbd71e5227941712244165b6234 verif-2401.7z
The above output can be created with the following commands:
UNIX: sha256sum [a-z]*7z
Windows: certutil.exe -hashfile free_models-2401.7z SHA256 certutil.exe -hashfile homepage-2401.7z SHA256 certutil.exe -hashfile verif-2401.7z SHA256
-
Move the downloaded files to your Shared Folder (E.g. C:\Users\Public\gensys" or "$HOME/gensys").
Uncompress the files in program that handle 7-zip files.
(If you don't have a program for 7-zip files,
you can download a program with this link: www.7-zip.org/download.html)
When unzipping the 7-zipped files, please uncheck the checkbox under "Extract to:", otherwise the zipped files will not be extracted to the correct location. E.g.: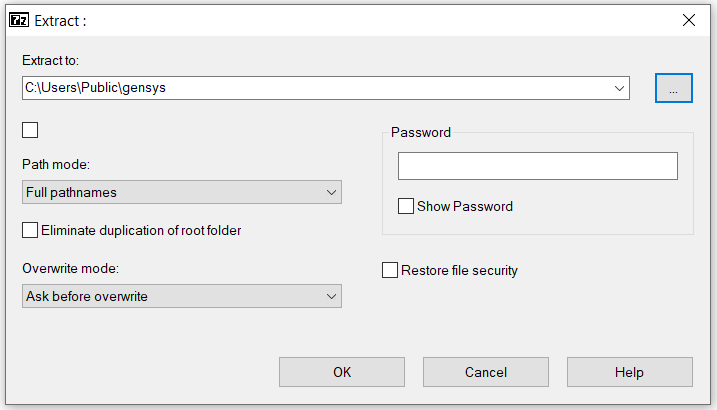
After 7-zipped files have been unzipped your directory should look as follows: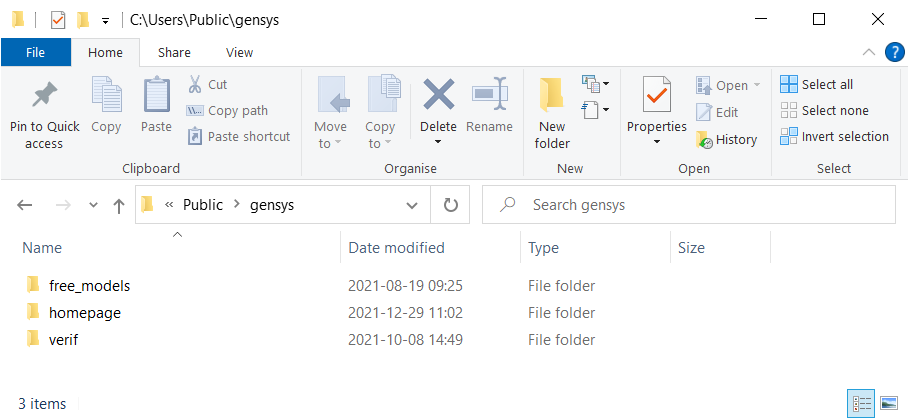
- The files free_models-2401.7z, homepage-2401.7z and verif-2401.7z can now be removed.
-
Download the following 7-zip files:
 Mint213-gensys24.7z.001
 Mint213-gensys24.7z.002
 Mint213-gensys24.7z.003
 Mint213-gensys24.7z.004
 Mint213-gensys24.7z.005
 Mint213-gensys24.7z.006
 Mint213-gensys24.7z.007
 Mint213-gensys24.7z.008
N.B webpage mega.nz requires a webbrowser that handles HTML5 and allows JavaScript to write files. Currently Chrome and Firefox works best.
Also make sure that no firewall prevents you from downloading files from the Internet.
The SHA256 message digest algorithm should give you the following output:b75b9e1660305450bd85b974338a5a5a2cc19cb71964ccb361fa91f26b79fbde Mint213-gensys24.7z.001 9376b734d40f0845562ccef9849bc9f121e1d7b03079aea4196c7fe73c3cfcd6 Mint213-gensys24.7z.002 22c92ca81c09aa78668c43cf9c67e2a82e01de1be302a2d82fd2e5536e6e9ad9 Mint213-gensys24.7z.003 b9a2a828dd8f7446f75ce7b3371803a63d718cc8184e26d2bb38f8db6c48c26f Mint213-gensys24.7z.004 a7ed4083a136634ce08625996dcf3a4da4432c2bc88c6ac8572015c5d418ec6d Mint213-gensys24.7z.005 8d5a5b9586da97236cd088fceb89dca2806b6347f2215ab7b9adfbacc92f7ee9 Mint213-gensys24.7z.006 9429ed0b32aefb04676434addf2a42b04bd2ab882de82233716f406afceb50f8 Mint213-gensys24.7z.007 4fad940d2c06c2516ba542687f27ebaf556ffe8c463b7292adfe491b38bd1908 Mint213-gensys24.7z.008
The above table can be obtained with the following command(s):UNIX: sha256sum Mint213-gensys24.7z.00?
Windows: certutil.exe -hashfile Mint213-gensys24.7z.001 SHA256 certutil.exe -hashfile Mint213-gensys24.7z.002 SHA256 certutil.exe -hashfile Mint213-gensys24.7z.003 SHA256 certutil.exe -hashfile Mint213-gensys24.7z.004 SHA256 certutil.exe -hashfile Mint213-gensys24.7z.005 SHA256 certutil.exe -hashfile Mint213-gensys24.7z.006 SHA256 certutil.exe -hashfile Mint213-gensys24.7z.007 SHA256 certutil.exe -hashfile Mint213-gensys24.7z.008 SHA256
- Contact info@gensys.se to get a link to a valid license file for your installation.
-
Create a directory for your virtual machines.
If you are installing a virtual machine for the very first time. Please create a directory to store your virtual machines in. E.g.: "C:\Users\Public\VirtualBox VMs" on a Windows-host or "$HOME/VirtualBox VMs" on a UNIX-host.
-
Uncompress the file archive.
Move the files downloaded under 3.1) to the location created under 3.3).
Mark file "Mint213-gensys24.7z.001" and with your right mouse button and select 7z -> Open Archive -> Extract.
After the virtual machine has been extracted, the files "Mint213-gensys24.7z.00[1-8]" can be removed.
(If you don't have a program for 7-zip files, you can download a program with this link: www.7-zip.org/download.html)
When unzipping the 7-zipped files, please uncheck the checkbox under "Extract to:", otherwise the zipped files will not be extracted to the correct location. E.g.: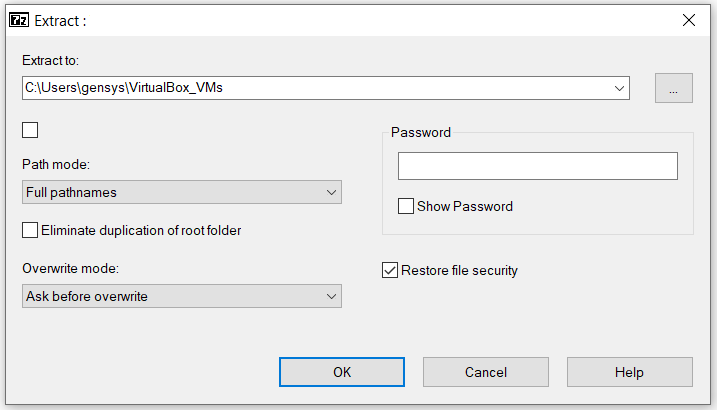
After 7-zipped files have been unzipped your directory should look as follows: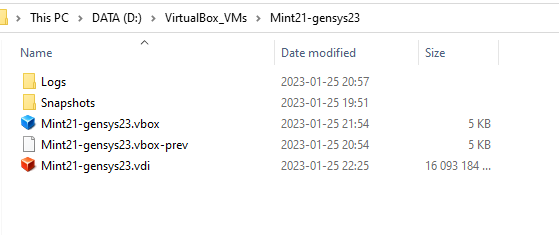
-
Setup the virtual machine.
Go to the newly created directory "Mint213-gensys24". Start VirtualBox by double-clicking file "Mint213-gensys24.vbox".
Mark the virtual machine "Mint213-gensys24" and click "Settings".-
Activate Shared Clipboard
On the left side in the popup-window select "General"
On the right side select "Advanced"
Under "Shared Clipboard" choose Bidirectional
Under "Drag'n'Drop" choose Bidirectional -
Set primary memory
On the left side in the popup-window select "System"
On the right side select "Motherboard"
Choose how much primary memory the virtual machine will have access to with the scale "Base Memory". Minimum recommended size is 1280MB. Maximum recommended size depend on the size of the primary memory of your host computer. You must choose a size within the green marked area of the scale. -
Set number of processors
On the left side in the popup-window, select "System"
On the right side, select "Processor"
Set number of processor(s) of your machine.
Valid number of processors are marked in green. -
Activate Shared Folders
On the left side in the popup-window select "Shared Folders"
On the right side select "gensys D:\gensys"
Click right mouse button and select "Edit Shared Folder"
Change "Folder Path" so it points to your "Shared Folder"-location. See under "Download and uncompress the documentation and the verification examples" above.
Folder Name: "gensys" must not be changed (N.B. Folder Name is case sensitive)
Do not check "Read-only".
Do not check "Auto-mount".
Leave text field "Mount point" blank
Check "Make Permanent" (if the option is visible)
Click OK
-
Activate Shared Clipboard
- In the VirtualBox main window, start the virtual machine by clicking the green arrow marked "Start"
-
Install Gensys license file.
Start webbrowser firefox in the virtual machine. Enter the link mentioned under 3.2) above, and download the file. Save the license file in directory "/opt/gensys/gensys-2401/bin".
(If you not are using gensys-2401, replace 2401 with the number of your version. You can check your version number with command:
grep 'export gensys' ~/.profile_gensys or type tsim )
Add execute permissions to file gen_processor_ID_check:
chmod +x /opt/gensys/gensys-2401/bin/gen_processor_ID_check
Test the search path to the license file with the following command:type gen_processor_ID_check
Test the license file with the following command:gen_processor_ID_check
-
Configure the slurm queue system by editing file: /etc/slurm/slurm.conf
Under "NodeName", set number of available processors for each node in the cluster.
If you have many machines in your cluster, command "NodeName" can be given multiple times.
After the file /etc/slurm/slurm.conf has been updated, the virtual machine must be restarted in order to make the changes to take effect. restart the slurm queue system by writing:
sudo /etc/init.d/slurmd    stop
sudo /etc/init.d/slurmd    start
sudo slurmctld -cD
In a terminal window: Test slurm by running program "/bin/hostname" via command sbatch:sbatch --output=sbatch.out <<+ #!/bin/sh /bin/hostname +
Output from the command will be sent to file sbatch.out
If file sbatch.out don't appear in your current work directory. Check if you can see the job in the Slurm graphical user interface:
sview &
If the status of the job is "PENDING". Open program "Oracle VM VirtualBox Manager" and go to Settings -> System -> Processor, and check that number of processors are greater or equal to the number defined in file /etc/slurm/slurm.conf.
If not, update file /etc/slurm/slurm.conf again, or shutdown the virtual machine and update number of processors in "Oracle VM VirtualBox Manager".
If you still have problems with the SLURM queue system, please consult section Debugging SLURM.