If you are missing VirtualBox or if your VirtualBox-version is older than 7.2.4, it is necessary to do these steps:
-
Make sure your machine is equipped with a 64-bits processor.
Primary memory > 16 GB
Free hard disk space > 100 GB
Restart your machine and check in your BIOS that Virtualization Technology is enabled.
Information on how to adjust BIOS-settings can be found here: wikihow or lifewire - If necessary, uninstall the old VirtualBox-version.
-
Download and install the new version of VirtualBox.
(When running the installer you maybe will get a message: Missing dependencies Python Core package and win32api bindings. However it is not necessary to install these two packages, unless you don't plan to use Python scripts with VirtualBox) - Create a Folder on your harddrive where you want to keep your Virtual Machines.
- Start program VirtualBox
-
In the PullDown-menu of program VirtualBox click "File -> Preferences" and do the following
-
Specify the location of your virtual machines
On the left side select "General"
On the right side under "Default Machine Folder"
Specify the path to the directory where you are want to save your virtual machines -
Change Host Key Combination
Select "Expert" in the upper left
On the left side select "Input"
On the right side select "Virtual Machine"
As default in VirtualBox "Host Key Combination" is set equal to Right CTRL. If you wish to be able to use your "Right CTRL"-Key, please choose another key. (The "Host Key Combination" is mainly useful in case you don't have a working mouse, and when you want to leave full screen mode)
-
Specify the location of your virtual machines
In this step you will create the following directories: free_models, homepage and verif.
N.B. If you have old versions of these directories, please remove/rename them before continuing with the installation.
-
Create a directory where you want to keep Gensys documentation files, verification examples
and your own workfiles.
The directory must have permissions so it can be used as a Shared Folder with the virtual machine.
E.g.: "C:\Users\Public\gensys" on a Windows-host or "$HOME/gensys" on a UNIX-host. -
In the newly created work directory.
Also create a directory where you can keep your own work files.
E.g.: "analyse" -
Download the following files:
free_models-2501.7z = Free vehicle models
homepage-2501.7z    = Documentation and tutorials
verif-2501.7z       = Verification directory
Webpage mega.nz requires a webbrowser that handles HTML5 and allows JavaScript to create and write to files. Currently Chrome and Firefox works best.
Also make sure that no firewall prevents you from downloading files from the Internet.
The SHA256 message digest algorithm should give you the following output:b13e7d25f35198c9d906bdb92b3d80a934ba4f87000c99f52d5a7d80921ebdba free_models-2501.7z 77df9a3a5c326574c1b24c53b021cc6fd26a33ee4da648cbe0013558e8047aac homepage-2501.7z 9b67cac9283fcd47dc2cd3404880483e81cc3dd4296153ae7422a270a6d10b2f verif-2501.7z
The above output can be created with the following commands:
UNIX: sha256sum [a-z]*7z
Windows: certutil.exe -hashfile free_models-2501.7z SHA256 certutil.exe -hashfile homepage-2501.7z SHA256 certutil.exe -hashfile verif-2501.7z SHA256
-
Move the downloaded files to your Shared Folder (E.g. C:\Users\Public\gensys" or "$HOME/gensys").
Uncompress the files in program that handle 7-zip files.
(If you don't have a program for 7-zip files,
you can download a program with this link: www.7-zip.org/download.html)
When unzipping the 7-zipped files, please uncheck the checkbox under "Extract to:", otherwise the zipped files will not be extracted to the correct location. E.g.: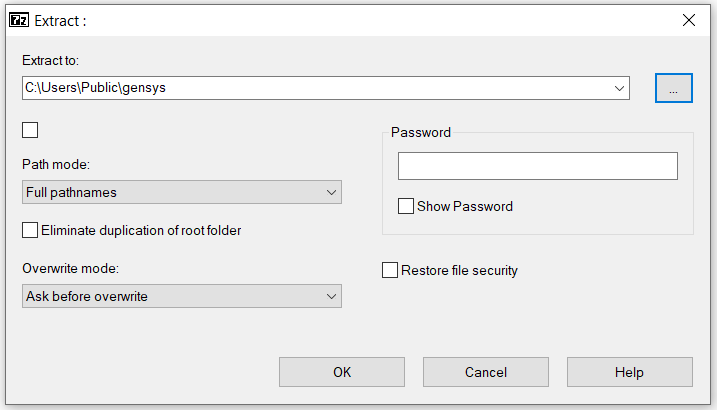
After 7-zipped files have been unzipped your directory should look as follows: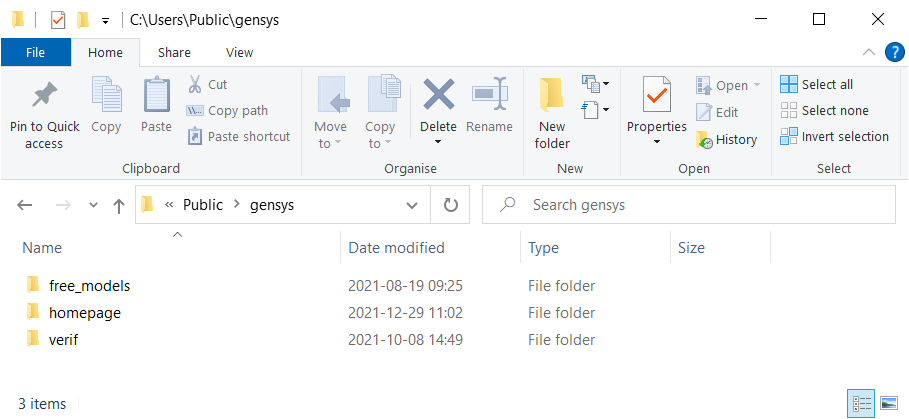
- The files free_models-2501.7z, homepage-2501.7z and verif-2501.7z can now be removed.
-
Download the following 7-zip files:
 Mint220-gensys25.7z.001
 Mint220-gensys25.7z.002
 Mint220-gensys25.7z.003
 Mint220-gensys25.7z.004
 Mint220-gensys25.7z.005
 Mint220-gensys25.7z.006
 Mint220-gensys25.7z.007
N.B webpage mega.nz requires a webbrowser that handles HTML5 and allows JavaScript to write files. Currently Chrome and Firefox works best.
Also make sure that no firewall prevents you from downloading files from the Internet.
The SHA256 message digest algorithm should give you the following output:6c1c6fc23cabb778dc52e0ad544de41855d0ea2bcef3756cb64845f3b4490848 Mint220-gensys25.7z.001 c5ab4ae5e428f574d587a1aa539592d7a748f15d6e3eef07729d2c7b7a71335a Mint220-gensys25.7z.002 7412be4f7087dff247ff5e25dcef3f8c9c0d707344fa40cc8a1eb305f9b54dbc Mint220-gensys25.7z.003 50aa81ba87554fe67d0d0afbb4db5189d065eacc2486f0573082f8ddd9839b0e Mint220-gensys25.7z.004 7d1da498c6aa0edb992e9e7be8de1aa4254f6d705896904659ee86a8993bdc52 Mint220-gensys25.7z.005 6ac74ecdb18e8742fef65dcab57e778d741e77e84c7b1ce45b4fe2bdedadfda8 Mint220-gensys25.7z.006 3838093e8100452ce7d8715f237263ee9b2d669b690dd6863f652c7c0c855a58 Mint220-gensys25.7z.007
The above table can be obtained with the following command(s):UNIX: sha256sum Mint220-gensys25.7z.00?
Windows: certutil.exe -hashfile Mint220-gensys25.7z.001 SHA256 certutil.exe -hashfile Mint220-gensys25.7z.002 SHA256 certutil.exe -hashfile Mint220-gensys25.7z.003 SHA256 certutil.exe -hashfile Mint220-gensys25.7z.004 SHA256 certutil.exe -hashfile Mint220-gensys25.7z.005 SHA256 certutil.exe -hashfile Mint220-gensys25.7z.006 SHA256 certutil.exe -hashfile Mint220-gensys25.7z.007 SHA256
- Contact info@gensys.se to get a link to a valid license file for your installation.
-
Create a directory for your virtual machines.
If you are installing a virtual machine for the very first time. Please create a directory to store your virtual machines in. E.g.: "C:\Users\Public\VirtualBox VMs" on a Windows-host or "$HOME/VirtualBox VMs" on a UNIX-host.
-
Uncompress the file archive.
Move the files downloaded under 3.1) to the location created under 3.3).
Mark file "Mint220-gensys25.7z.001" and with your right mouse button and select 7z -> Open Archive -> Extract.
After the virtual machine has been extracted, the files "Mint220-gensys25.7z.00[1-8]" can be removed.
(If you don't have a program for 7-zip files, you can download a program with this link: www.7-zip.org/download.html)
When unzipping the 7-zipped files, please uncheck the checkbox under "Extract to:", otherwise the zipped files will not be extracted to the correct location. E.g.: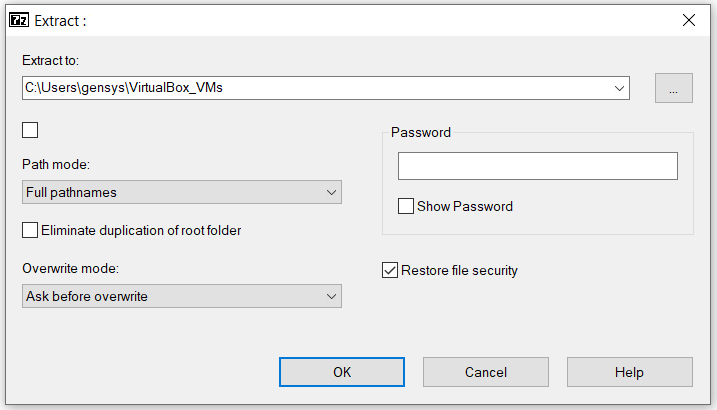
-
Setup the virtual machine.
Go to the newly created directory "Mint220-gensys25". Start VirtualBox by double-clicking file "Mint220-gensys25.vbox".
Mark the virtual machine "Mint220-gensys25" and click "Settings".-
Activate Shared Clipboard
On the left side in the popup-window select "General"
On the right side select "Advanced"
Under "Shared Clipboard" choose Bidirectional -
Set primary memory
On the left side in the popup-window select "System"
On the right side select "Motherboard"
Choose how much primary memory the virtual machine will have access to with the scale "Base Memory".
Recommended size is ~3000MB.
Minimum recommended size is 1280MB. -
Set number of processors
On the left side in the popup-window, select "System"
On the right side, select "Processor"
Set number of processor(s) of your machine.
Valid number of processors are marked in green. -
Activate Shared Folders
There are mainly two reasons why we recommend to create a Shared Folder that is accessable both from the Virtual Machine and the Host Computer:- The hard disk of the Virtual Machine is limited to ~70 GB.
- If a file needs to be copied into a mail or sent to a printer, it is often easier if the host can access the file.
To the left in the Setting popup menu, click "Shared Folders"
Under "Machine Folders" select "C:\Users\gensy\gensys"
Click the middle icon to the right "Edits selected shared folder"
Edit "Folder Path" in the popup-window, so it points to the location where you want to keep the files shared with the host computer.
(The location shall be the same as used under Download and uncompress the documentation and the verification examples)
Do not change "Folder Name", it must be equal to "gensys" otherwise Gensys will not find the location.
(N.B. The "Folder Name" is case sensitive, all characters must be in lowercase)
Do not check "Read-only".
Do not check "Auto-mount".
Leave text field "Mount point" blank
Check "Make Permanent" (if the option is visible)
Click OK
-
Activate Shared Clipboard
- In the VirtualBox main window, start the virtual machine by clicking the green arrow marked "Start"
-
Install Gensys license file.
Start webbrowser firefox in the virtual machine. Enter the link mentioned under 3.2) above, and download the file. Save the license file in directory "/opt/gensys/gensys-2501/bin".
(If you not are using gensys-2501, replace 2501 with the number of your version. You can check your version number with command:
grep 'export gensys' ~/.profile_gensys or type tsim )
Add execute permissions to file gen_processor_ID_check:
chmod +x /opt/gensys/gensys-2501/bin/gen_processor_ID_check
Test the search path to the license file with the following command:type gen_processor_ID_check
Test the license file with the following command:gen_processor_ID_check
-
Configure the slurm queue system by editing file: /etc/slurm/slurm.conf
Under "NodeName", set number of available processors for each node in the cluster.
If you have many machines in your cluster, command "NodeName" can be given multiple times.
After the file /etc/slurm/slurm.conf has been updated, the virtual machine must be restarted in order to make the changes to take effect. restart the slurm queue system by writing:
sudo /etc/init.d/slurmd    stop
sudo /etc/init.d/slurmd    start
sudo slurmctld -cD
In a terminal window: Test slurm by running program "/bin/hostname" via command sbatch:sbatch --output=sbatch.out <<+ #!/bin/sh /bin/hostname +
Output from the command will be sent to file sbatch.out
If file sbatch.out don't appear in your current work directory. Check if you can see the job in the Slurm graphical user interface:
sview &
If the status of the job is "PENDING". Open program "Oracle VM VirtualBox Manager" and go to Settings -> System -> Processor, and check that number of processors are greater or equal to the number defined in file /etc/slurm/slurm.conf.
If not, update file /etc/slurm/slurm.conf again, or shutdown the virtual machine and update number of processors in "Oracle VM VirtualBox Manager".
If you still have problems with the SLURM queue system, please consult section Debugging SLURM.
Please test your installation by running the tutorial examples: ../../tutorial/README.html